.png "How to network Two Computers Easily")
Today there are several computers in a house.You may also have a desktop and a laptop.Didn't you face any problems when transferring files from one to another? Here's how to connect your Laptop with your desktop.You can do this with 2 desktops also,but you better have 2 monitors for that.
First of all you need to get a crossover network cable.Very cheap about Rs.30 per meter (SL).In a normal network cable,cables connect to the sockets in the same pattern.But a crossover network cable connects in different patterns.You can do this without a crossover cable if you have a router or switch.And you need two network cables also.You can get the sockets (rj45) connected to the cable when you buy it.
Now connect the cable to the desktop and the laptop.To the RJ45 port.You can see it little bigger than the normal RJ11 telephone port.Turn on both computers then.Now we have to connect the computers from their network addresses.As there's addresses to identify houses there are addresses to PCs also.They are IP addresses.There are several private IP address ranges, you can choose one.
Class A 10.0.0.0 - 10.255.255.255
Class B 172.16.0.0 - 172.31.255.255
Class C 192.168.0.0 - 192.168.255.255
These are only private IP ranges.Cannot use for internet.
To give IP addresses goto Network and sharing centre.Click on Local area connection.Then click properties button.You'll see a window like this.

Select Internet protocal version 4 (TCP/IPv4) and click Properties again.Choose use the following IP addresses from the combo box and give the IP address.
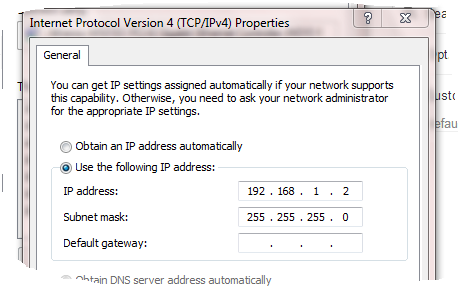
If you gave 192.168.1.2 as the IP address ,give 192.168.1.3 or other number like for he next computer.
Then click OK.Now we have to set the WORKGROUP settings.
Type workgroup in the start menu and get change workgroup name.
Click change workgroup.

Below you can enter the workgroup name.Give one name for the both computers.Same name.Apply settings.
Now you have to create a user account in both computers.Give a account name and a password.It is required when logging in to the computer from the other computer.
Now you're done.Goto Computer and select network from left panel.

Double click on you Laptop/Desktop PC name and you'll be prompted to login.Give username and password for the account you created.You'll see the files shared.This is more faster than copying files using a pen drive.My network card supports 1000Mbps.Most new laptop and desktop Network cards support that speed but there are some which only support 100Mbps,but don't worry its still faster than copying using a pen drive.
To share more files follow these steps.
Right click on the Folder you want to share and select properties.
Then select Sharing TAB.
Click share
Select the user account you created for sharing.You can choose everyone also but ,it will share the file without any authentication.


You can edit permissions to the folder.
Then Click share.
Now you have shared the file with your workgroup.You can access the file through network in the computer window.
Now you have shared the file with your workgroup.You can access the file through network in the computer window.
Enjoy! Comment any problem/questions!!
:) :) :) :) :) :) :)
Comments
Post a Comment
Like our post?
Want to know more?
Please ASK!