So I was wondering if we can transter files between my android and laptop without worrying about the features that apps provide.Such as PC file transfer options which uses the web
browser for uploading and downloading files.They are awesome,but only upto some point.Sometimes they wont work just as fast as you want them to. When transfering from your android to PC,
you'll have to go through your complicated folder arrangement (which is usual) in android to locate and download them via the web interface.I myselft don't like this PC file transfer option
which is supplied by the File Commander android app.I tried several other apps too.This post is for the people who dont have that option in your android File managing app and people who are
like me,that dont like that web interfaced PC file trasferring.
First I tried using the windows built in file sharing techniques.Which is usually sharing a folder on your computer to certian users on your network and allowing them to read and write.It
completed like 50% of my expectations.I could transfer files from my laptop to android,but not the other way around.I think it is an issue of not having permission to upload from android.
Rooting may solve this but I didn't want to void my warranty just to copy files between my laptop and android.And there are many issues of using that built in interface in windows.It is run
by a type a server called SAMBA.There are different versions of SAMBA servers currently being used.(1.0 & 2.0 etc).So to work properly the version of your SAMBA server that is on your laptop
must be supported by your android app.That depends on your version of windows.And different android versions may restrict ports used by your windows SAMBA server so you cannot connect to them.
I wanted to make this possible with the capabilities of android and windows operating systems.Seriously,if I succeed I knew I dont have to watch those annoying ads from using free apps or pay to remove them.And I wanted it to work just like two networked windows computers.
So I had to turn to using a FTP server.FTP stands for File Transfer Protocol.These are made for tansferring files in a network.This method needs some third party software installation however.
But only on your laptop,which has ample amount of resources to run a small server just to copy files between your android and laptop.
Lets get to work.
Here we are going to use FileZilla FTP server.This thing is great,it is usually used for uploading files to web servers, like if you're running a website.It runs as a windows service in the
background.Once you've set up the server its almost like a windows built in service.Well we can say it meets about 90% of my expectations.
You dont have to own an android to use this method, you simply need a file manager app that supports FTP.Two of the major file managers that support FTP are File Commander & ES file explorer.
I prefer File Commander because ES free version has too many ads.
You need access to your WIFI router's setup page to do this.If you aren't sure about it don't worry I'll discuss it later.
I followed this tutorial on HowToGeek to setup FileZilla server.It is a very detailed tutorial.If you arent interested in getting full knowlege on how to setup one just follow me.
Setting up FileZilla server
Go to this link and download FileZilla server setup file(2MB).And follow the screenshots to complete the installation.


After installing open FileZilla Server interface.The server should be already running as you selected during the installation.

This windows will appear.

You don't have to change anything.Leave it as it is and click connect.
File Menu > Edit > Users


Type ipconfig and press enter.

Under Wireless LAN adapter or something similar to that you can see IPV4 address.You need to write it down or leave this open.

Setting up your android
I'm using File Commander.But other apps will have an interface very much similar to this.

Open the left pane.
Scroll down and select FTP.

Click the + button at the right top corner.

Fill in the dialog box like this.Make sure you select Active in the Mode section. The username and password corresponds to the user that you created when setting up the server.

You can fill Show as with anything you like.It is like the display name.
Click OK.
Now a new entry will be created using the Name you provided.

Click on it.
The folder on your laptop will be opened.You can treat it as it was on your android.

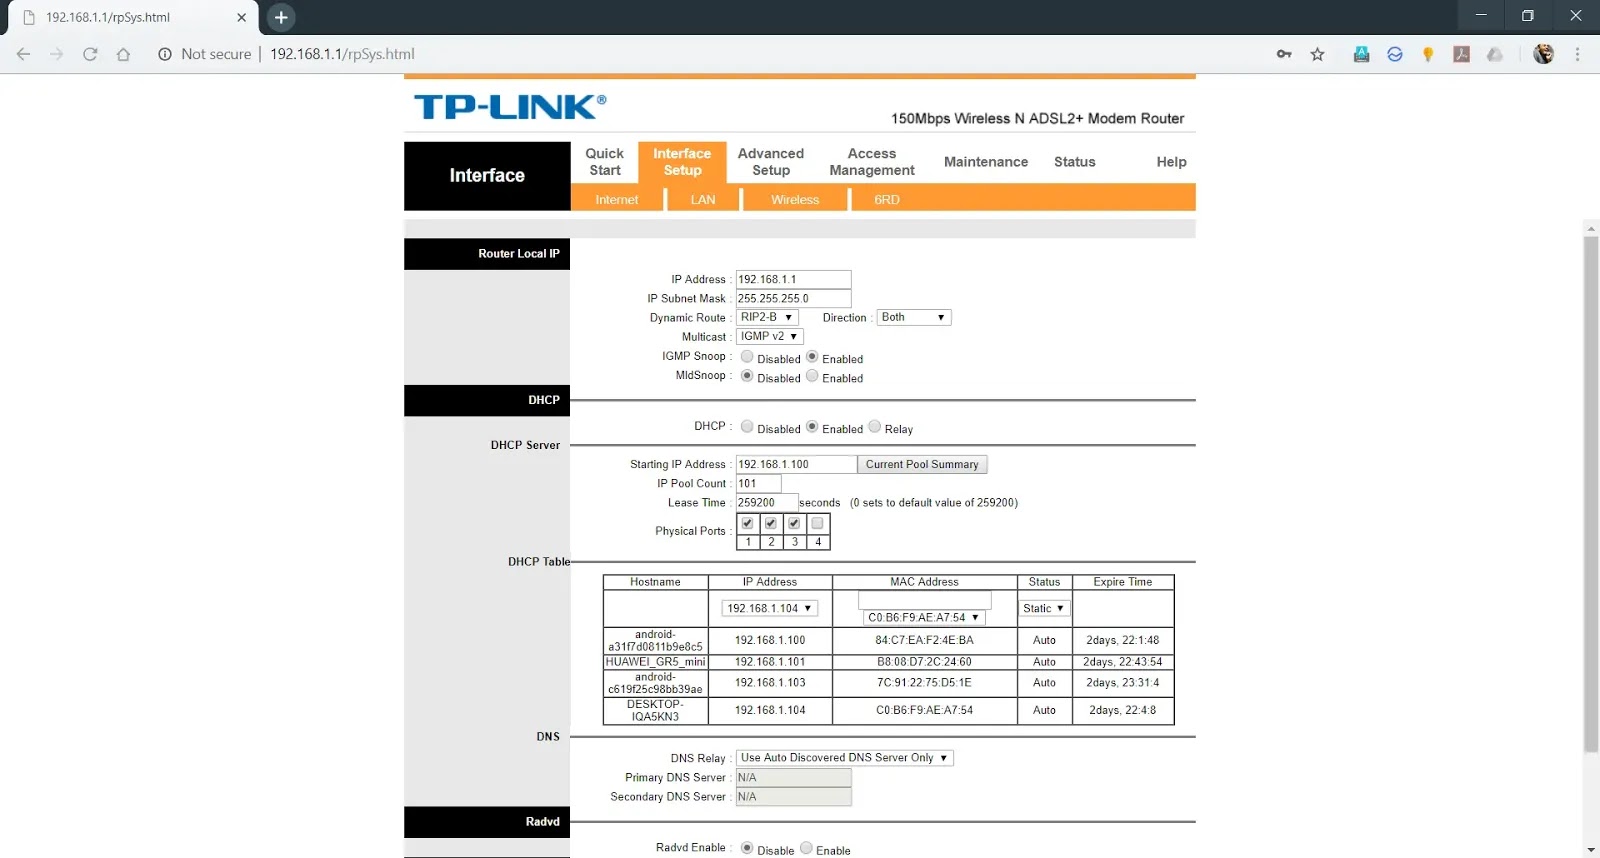
To ensure the longetivity of this hack we need to assign a perment IP adress to your laptop from your local network.
You need access to your router's setup page for this.
Open your web browser.In the adress bar type the Default gateway ip address which can be found when you enter ipconfig command to command prompt under Default Gateway.
The default username and passwords can be found printed on your router.Try admin & admin or user & user for both username and password.Usually it is one of these by default.
This varies from router to router.We need to assign a static IP address to your laptop in router's DHCP server.

Here you will need your laptop's wireless adapter's MAC ( Physical address) address.You can find that by entering the command ipconfig /all in command prompt.


browser for uploading and downloading files.They are awesome,but only upto some point.Sometimes they wont work just as fast as you want them to. When transfering from your android to PC,
you'll have to go through your complicated folder arrangement (which is usual) in android to locate and download them via the web interface.I myselft don't like this PC file transfer option
which is supplied by the File Commander android app.I tried several other apps too.This post is for the people who dont have that option in your android File managing app and people who are
like me,that dont like that web interfaced PC file trasferring.
First I tried using the windows built in file sharing techniques.Which is usually sharing a folder on your computer to certian users on your network and allowing them to read and write.It
completed like 50% of my expectations.I could transfer files from my laptop to android,but not the other way around.I think it is an issue of not having permission to upload from android.
Rooting may solve this but I didn't want to void my warranty just to copy files between my laptop and android.And there are many issues of using that built in interface in windows.It is run
by a type a server called SAMBA.There are different versions of SAMBA servers currently being used.(1.0 & 2.0 etc).So to work properly the version of your SAMBA server that is on your laptop
must be supported by your android app.That depends on your version of windows.And different android versions may restrict ports used by your windows SAMBA server so you cannot connect to them.
I wanted to make this possible with the capabilities of android and windows operating systems.Seriously,if I succeed I knew I dont have to watch those annoying ads from using free apps or pay to remove them.And I wanted it to work just like two networked windows computers.
So I had to turn to using a FTP server.FTP stands for File Transfer Protocol.These are made for tansferring files in a network.This method needs some third party software installation however.
But only on your laptop,which has ample amount of resources to run a small server just to copy files between your android and laptop.
Lets get to work.
Here we are going to use FileZilla FTP server.This thing is great,it is usually used for uploading files to web servers, like if you're running a website.It runs as a windows service in the
background.Once you've set up the server its almost like a windows built in service.Well we can say it meets about 90% of my expectations.
You dont have to own an android to use this method, you simply need a file manager app that supports FTP.Two of the major file managers that support FTP are File Commander & ES file explorer.
I prefer File Commander because ES free version has too many ads.
You need access to your WIFI router's setup page to do this.If you aren't sure about it don't worry I'll discuss it later.
I followed this tutorial on HowToGeek to setup FileZilla server.It is a very detailed tutorial.If you arent interested in getting full knowlege on how to setup one just follow me.
Setting up FileZilla server
Go to this link and download FileZilla server setup file(2MB).And follow the screenshots to complete the installation.


After installing open FileZilla Server interface.The server should be already running as you selected during the installation.

This windows will appear.

File Menu > Edit > Users

Click Add.

Give it a name and password.


Select Shared Folders from the Page section.

Click Add button and choose a folder.I recommend creating a New Folder just for this purpose.

As I am not going to access this folder using FTP through internet, I'm giving it full access.
You can see that I have selected all the checkboxes.

Click OK.
Allow port 21 from windows Firewall
Now we have to allow the users from the network to access your server.To do that the exception must be added to your windows firewall.
In search bar type Windows Firewall with Advanced Security and Open it.

Select Inbound Rules from the left pane and then New Rule from the right pane.


Follow the screens.


Alright, now we've completed like 90% of the work.Now you can even login from your android.To do so you need to know your laptop's IP address.Which is given locally by your router.Not the one that pops up when you type What is my ip in Google.
There are several ways to find this.This will work on any Windows OS.
Type cmd in search and press enter.


Setting up your android
I'm using File Commander.But other apps will have an interface very much similar to this.

Open the left pane.
Scroll down and select FTP.

Click the + button at the right top corner.

Fill in the dialog box like this.Make sure you select Active in the Mode section. The username and password corresponds to the user that you created when setting up the server.

You can fill Show as with anything you like.It is like the display name.
Click OK.
Now a new entry will be created using the Name you provided.

Click on it.
The folder on your laptop will be opened.You can treat it as it was on your android.

To ensure the longetivity of this hack we need to assign a perment IP adress to your laptop from your local network.
You need access to your router's setup page for this.
Open your web browser.In the adress bar type the Default gateway ip address which can be found when you enter ipconfig command to command prompt under Default Gateway.
The default username and passwords can be found printed on your router.Try admin & admin or user & user for both username and password.Usually it is one of these by default.
This varies from router to router.We need to assign a static IP address to your laptop in router's DHCP server.
Here you will need your laptop's wireless adapter's MAC ( Physical address) address.You can find that by entering the command ipconfig /all in command prompt.

Save your settings.
This last part is very essential.Otherwise you'll get problems when connecting to the FTP server after router or laptop restart.
Now the transfer speed will depend on your router.I have a very cheap TP Link router provided by my ISP.However it provides me about 35Mbps (roughly 4MB/s).If your router is very good you can get faster speeds.
And one more thing, you can disable the FileZilla server from startup.It is actually the FileZilla server interface which is shown in the startup.The service starts up and runs in background.Just like it was built in.

Comments
Post a Comment
Like our post?
Want to know more?
Please ASK!